
I love my new Wet n Wild palettes from this
post, but all of them just take SO MUCH room. I have a few quads, duos
and single shadows that are taking up lots of space, so I decided to
make my own palette.
I looked around on ebay for empty magnetic palettes, but they were
shipped from China and that would just take too long and I wanted my
project done ASAP.

I ordered the palette on December 2nd and got it around the 6th, but I
really didn't have time to work on my project until Saturday, when I
asked the over protective bf (who calls me "dropsey", cuz I drop
everything) to help me.

What you need:
- Empty eye shadow palette.
- Heat source: lighter(not the best option), blow drier(works better than a lighter, but takes longer than the latter option) or in my case a heat gun(definitely recommend this one).
- Or Q-tips and alcohol.
- Exacto knives or a thin knife if you don't have them.
- A glue gun and glue sticks.
- A lot of patience and time!
First step: Depotting Eyeshadows
You
have 2 different options to do this: heat and alcohol!(haha that sounds
funny). I actually used both, in my opinion the easiest option is heat,
but both will work. With the alcohol technique there's a higher change
you break your eyeshadow and you don't want that!
Heat Technique:
The over protective(and a bit of a pyromaniac) bf, decided he was going
to be doing the "melting", cuz fun and he doesn't want me to get
hurt(bleh), cuz you know I'm super clumsy and I'll end up burning down
the house according to him.
What you basically have to do, is heat up the palette evenly from
underneath, until the plastic is soft enough for you to be able to just
push the eyeshadow up and out from below.

Step 1: Remove the sticker from the black of the palette.
It doesn't always come out entirely, but just peel off as much as you can.

Then the fun part...
Melting...
I told my bf that he turned into Phoebe's brother from Friends, in case
you are not a Friends fan(I so am), he said his hobby was to melt
things...

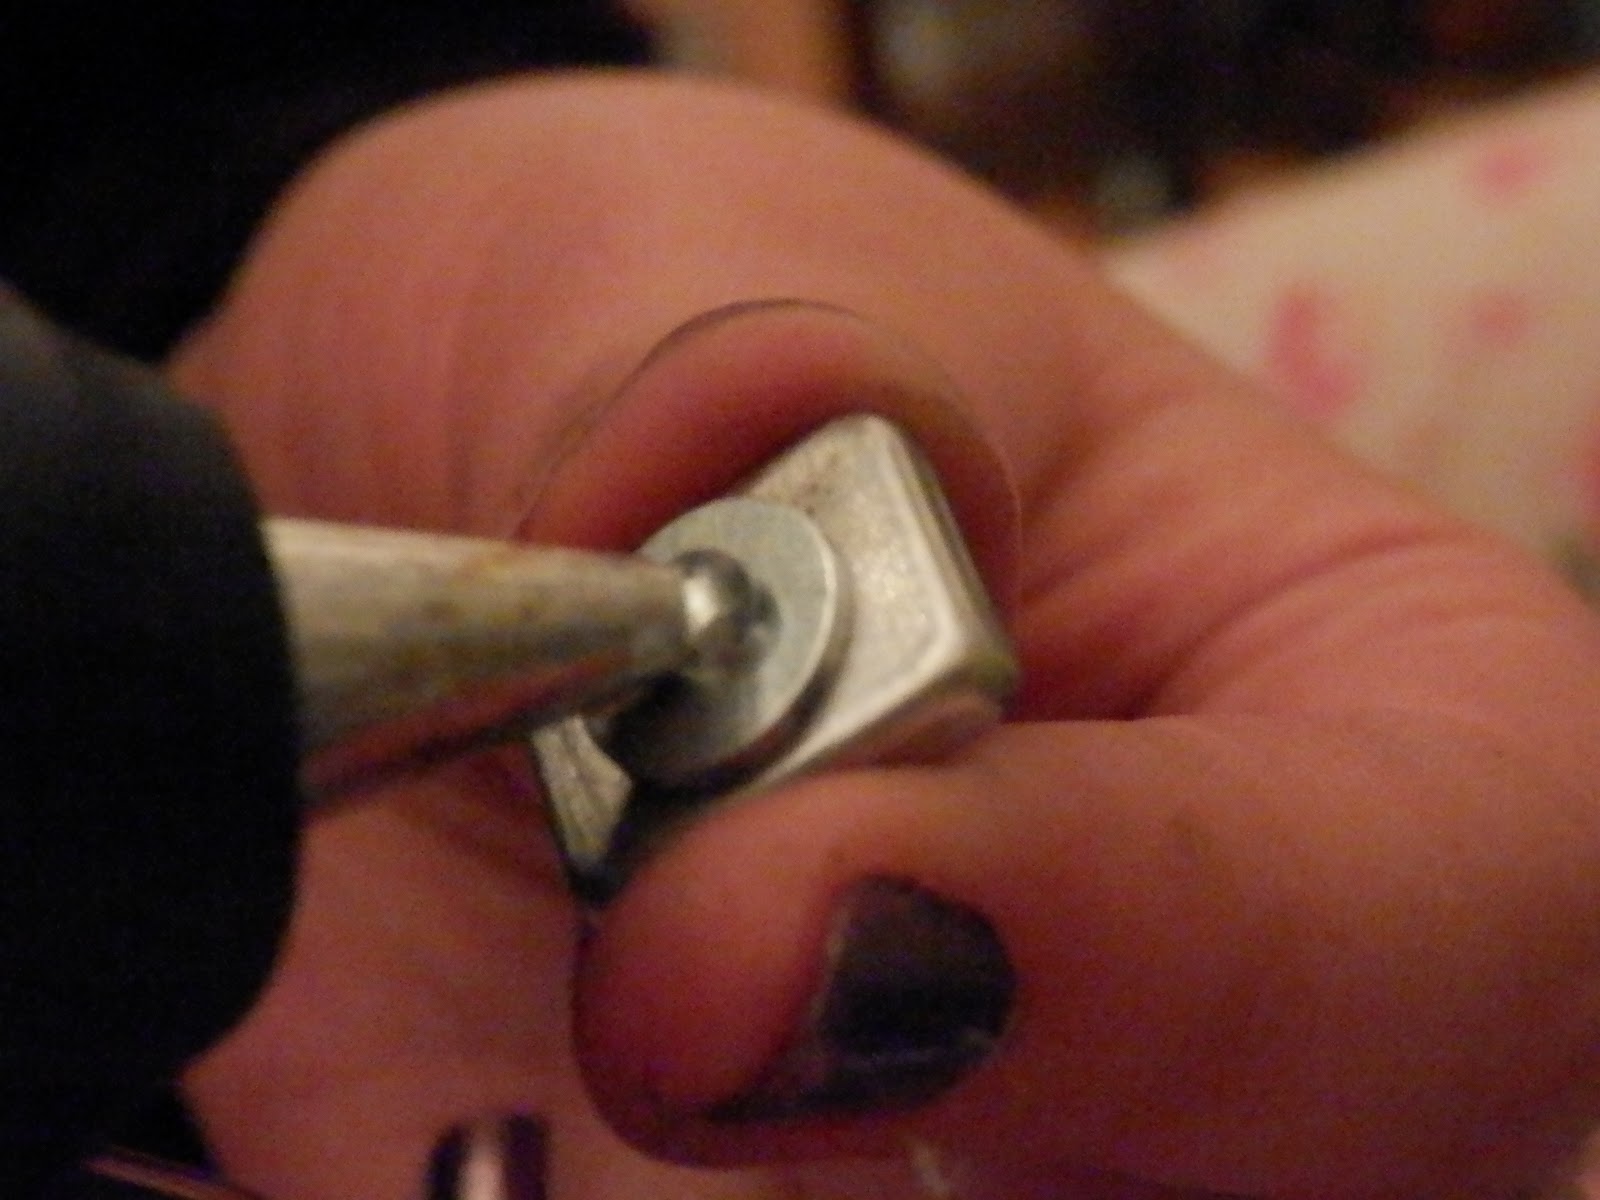
Step 2: Heat up the plastic below the eye shadow until it softens or it's malleable. You can do this either with a lighter, a hair dryer or a heat gun if you have one. Try grabbing the palette by the lid since this won't be the part that you will be warming up, if it gets too hot, get pliers and use that to grab the palette. Make sure you have something to set the heat gun onto, so that it won't damage anything, those things REALLY heat up!

Step 3: Push the eye shadow from below with slow and steady pressure (using a screwdriver or a pick- pictured) the pan like this:
Be careful and it won't break :)
Apparently
I'm a huge noob and I forgot to take pictures of this!! I'm kicking
myself in the butt right now *sigh* oh well! I hope the explanation will
work.
The reason I tried the alcohol to remove the eye shadow from a container, is cuz I had this really cute Jane Iredale eye shadow and...well I'm a sucker for packaging, it just looks so PRETTEH!! I just couldn't bear the fact it would be destroyed, so I thought alcohol will either soften the glue or somehow dissolve it.
Step 1: Wet a Q tip in alcohol.
Step 2: Go around the edges of the eye shadow with the wet Q tip, the good side of this is that alcohol will just evaporate eventually and your eyeshadow will be left unharmed!(yay!)
Step 3: With
the help of an exacto knife or a really thin knife, find the thickest
empty spot between the eye shadow pan and the container edge and jiggle
your knife between the pot and the container carefully. I cannot
stress this enough, if you are not careful, you will break your eye
shadow(you can simply fix it by pouring alcohol in it and pressing it
down, but still). Keep jiggling until the it loosens up and then just
pop the eye shadow out. I did this with my Jane Iredale eyeshadow and my
Global Goddess Beauty eyeshadow. The Jane Iredale came out perfectly, but I screwed up the Global Goddess Beauty one *sad face*.

Step 2: Heat up the plastic below the eye shadow until it softens or it's malleable. You can do this either with a lighter, a hair dryer or a heat gun if you have one. Try grabbing the palette by the lid since this won't be the part that you will be warming up, if it gets too hot, get pliers and use that to grab the palette. Make sure you have something to set the heat gun onto, so that it won't damage anything, those things REALLY heat up!

Step 3: Push the eye shadow from below with slow and steady pressure (using a screwdriver or a pick- pictured) the pan like this:
Be careful and it won't break :)
Alcohol Technique:
 |
| See? SO PRETTEH! |
The reason I tried the alcohol to remove the eye shadow from a container, is cuz I had this really cute Jane Iredale eye shadow and...well I'm a sucker for packaging, it just looks so PRETTEH!! I just couldn't bear the fact it would be destroyed, so I thought alcohol will either soften the glue or somehow dissolve it.
Step 1: Wet a Q tip in alcohol.
Step 2: Go around the edges of the eye shadow with the wet Q tip, the good side of this is that alcohol will just evaporate eventually and your eyeshadow will be left unharmed!(yay!)
 |
| Screwed up Global Goddess Beauty eyeshadow |
Second Step: Setting up your palette

Once all your eye shadows are ready to go on the palette, you have to make sure the palette is ready for them. Mine came with the spaces to put 26mm hot pots on it(as you can see on the picture in the right), so I removed this. If you get one of the Coastal Scents palettes, you'll have to do the same.

Grab a regular, more sturdy kitchen knife and stick it in one of the corners, lift up the foam part with spaces for the hot pots.

Once you grab a corner, you will be able to lift it all up and remove it from the palette. Then, clean up any remaining residue.

Pick up the magnets from the foam part, you might need them later.
Third Step: Getting your palette together
Once
the palette is ready and the shadows depotted, all you have to do, is
put it all together(yay), and for this you will need a glue gun.

Wet n wild eye shadows don't work with magnets, so you will definitely need the glue gun for them.
All
you have to do is put some glue with the glue gun on the back of the
eye shadow pot, stick it to the palette and repeat until all the eye
shadows you want on the palette are in place.
For the pots that do work with a magnet, I stuck the magnet itself to the palette.
Sadly the Wet n Wild eye shadows from the trios and the 8 eye shadow
palettes are not the same size, so my palette looks a bit uneven as you
can see in the picture on the right.
Once everything is in place you will have your own customized palette. Mine ended up looking like this:

I used the tags from the back of my eye shadow
singles/duos/trios/palettes and stuck them on the lid so I can know
which shadows I'm using.

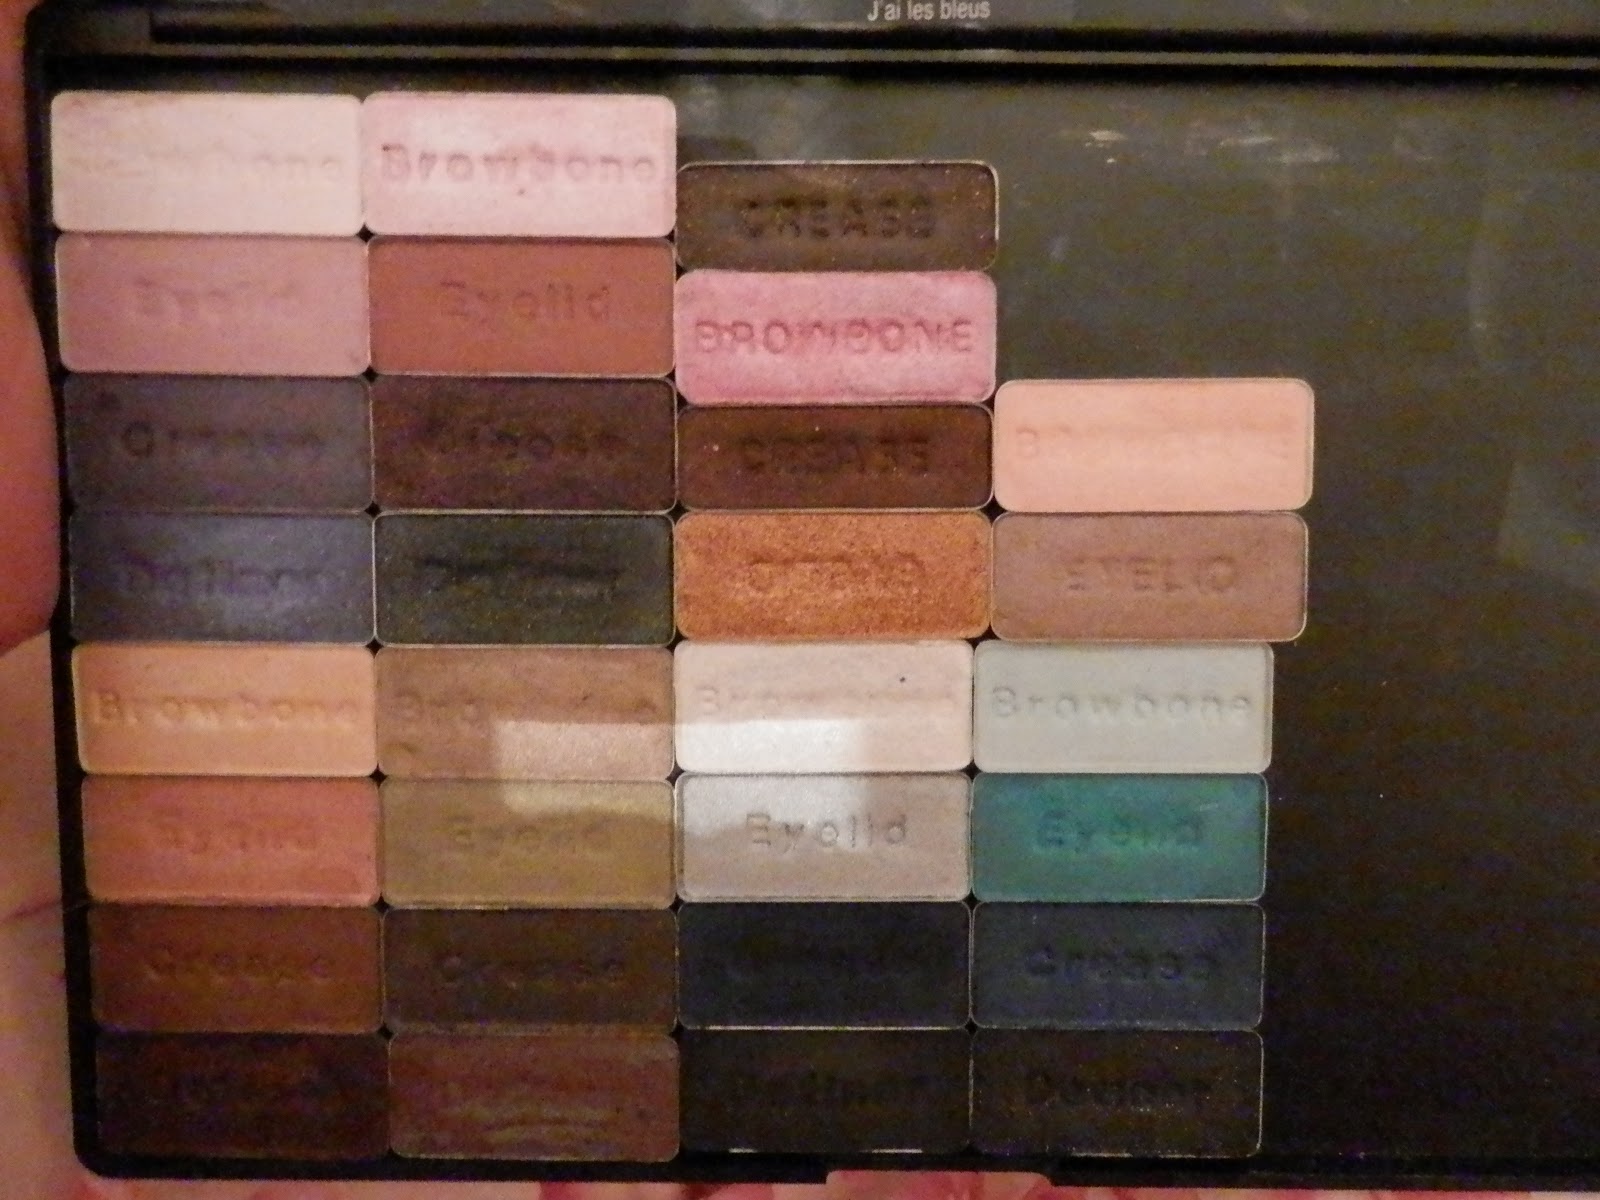
The shadows on my palette are(from left to right, bottom to top):
- WnW Comfort Zone(bottom left corner)
- WnW Petal Plusher(top left corner)
- WnW Blue Had Me At Hello
- WnW I'm Getting Sunburned(on top of the right side of Blue Had Me At Hello)
- WnW Silent Treatment(crease color on top of I'm Getting Sunburned, and the rest on the right side of Blue Had Me At Hello)
- WnW I Dream Of Greenie( on top of Silent Treatment)
- The Balm Matt Batali
- Small round single eye shadows are from Coastal Scents, I got 4 from the order with the palette and 4 from a previous order.
- Clinique Trio From left to right: Strawberry Fudge duo and Slate from Stay Matte.
- Global Goddess Kumaon( on top of pink Clinique shade)
- NYX TS06 trio(on top of Kumaon)
- Clinique Blush( on top of TS06)
- Mia Belezza Vino duo( on the far right)
- Jane Iredale Dark Suede(on top of Vino)
The aftermath!


I recommend doing this over cardboard, plastic sheets, old newspapers and such, because the surface will get dirty.
Total
labor time between myself and my minion- about 2.5 hours straight. It
may take longer if you're working by yourself, I'm glad I have my
personal slave(LOL), just kidding, I love him. I must admit, it was
exhausting, but it helps to have help during projects like this. It
saves time to have one person depotting the shadows and to have the
other person place them in the palette. Have a friend to come along and
help, you'll have this done much quicker.
I'm super happy with the end result, I love how my new mega-palette
looks. It definitely saves a lot of space in my drawers, it's easier to
carry around and I have more shades available all at once. I used the
mirror from the Clinique eye shadow trio and blush. You can put in
whatever works for you, but it's always handy to have an extra mirror
like this.
I hope this is not the last customized palette that I make, I can't
wait to get enough Urban Decay eye shadows to fill up another one of
these babies.
I hope you enjoyed this DIY and that it comes in handy for you. If you enjoy this post, please share it with your friends.
Awesome tutorial! Way better than the one I lazily slapped together..I don't know about you but having all my shadows in one place where I can see them all makes me happy:)
ReplyDeleteAwww thank you! And yes it does, I love seeing them all sitting together, it's much better than having a stack of them! And easier to reach them to create looks and what not! I love it, I wanna get another one to fit more stuff in it :D
Delete